
 STEP 1 STEP 1
First we need to configure
your thermostat -
This will set the time, the day of the week, and the temprature scale you want to use.
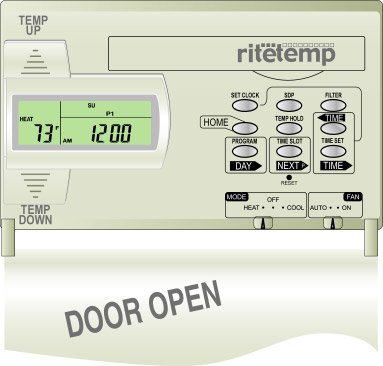
Open the cover over the key pad ot the thermostat.
Mode Switch must be in HEAT or COOL position.
 STEP 2 STEP 2
To set the day of the week -
Press SET CLOCK once to set the day of the week. The day of the week display flashes. (Initially SU for Sunday)
Press TIME-Forward or TIME-Back buttons to select the day.
Press HOME to store your settings.
The upper TIME button moves back in time the lower TIME button moves forward.
STEP 3
To set the time of day -
Press SET CLOCK twice to set the time of day. The time display flashes.
Press TIME-Forward or TIME-Back buttons to select the time.
Press HOME to store your settings.
Press and hold the TIME button for faster setting. The upper TIME button moves back in time the lower TIME button moves forward.
STEP 4
Your Thermostat is configured -
For help programming your thermostat,
CLICK HERE
Press HOME to store your settings.
Press
Installation Complete!
Your system should now be operational.
If your system is still not working correctly, please check all the steps once again.
We can start to check if there is problem in your system by following the Trouble Shooting procedure.
After you have rechecked your steps for installation, and trouble shot your system, you can contact via email.
|