
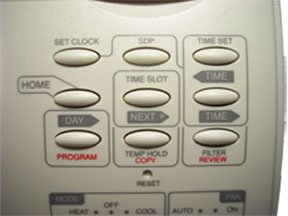
 STEP 1 STEP 1
Now we can program
your thermostat -
Keep in mind your thermostat is already programmed with the Energy-Star compliant settings. You can try those out for a few days, or continue programming your own custom program below.
Mode Switch must be in HEAT or COOL position.
Press PROGRAM button
STEP 2
Set the day you want to program for-
When you pressed the PROGRAM button once, the PROGRAM FOR icon will come on. The day icon will show SU(Sunday). Press PROGRAM again to advance the day selection to Mo Th We Th Fr (week days).
Each time you press the program button the day selection will advance one selection.
STEP 3
Select the TIME SLOT you want to program -
To change the TIME SLOT (P1, P2, P3, P4) press the NEXT button. The display will cycle through the time periods in sequence. Select P1.
Each time you press the NEXT button the time slot advances one TIME SLOT.
STEP 4
Select the desired temperature for that TIME SLOT -
To change the temperature for that TIME SLOT press the TEMP UP / TEMP DOWN buttons.
Each time you press a TEMP button the temperature changes by one degree.
STEP 5
Select the time of day you want that TIME SLOT to represent -
To set the time when P1 will begin , press the TIME forward or TIME back buttons to move the set point forward or backward in time.
Each time you press a Time button the time changes by 15 minutes. Press and hold the Time button for fast advance.
STEP 6
Select the next TIME SLOT and program temp and time:
Press NEXT>, the display will show P2, for Period 2. Repeat setting temp and time. Select the remaining TIME SLOT's, P3 and P4. Program their temp and time info.
STEP 7
Repeat the above procedures for each day of the week. Note - weekdays are programmed as a block, shown as MO TU WE TH FR on the display.
Push DAY> button to cycle through the days.
STEP 8
To program an alternate or "Special Day" program, that you can access at any time, press PRO until PROGRAM FOR for SDP DAY is displayed. Repeat the procedure above to program temp settings for the Special Day.
STEP 9
When finished with your custom program, either wait 15 sec or press HOME to save and run your program.
o program for cooling, select COOL with the Heat/Cool MODE switch and repeat the above procedure.
Installation Complete!
Your system should now be operational.
If your system is still not working correctly, please check all the steps once again.
We can start to check if there is problem in your system by following the Trouble Shooting procedure.
After you have rechecked your steps for installation, and trouble shot your system, you can contact via email.
|